# Hello again!
As the title suggests, I come to you with a small guide to get you started with making your own VM! It is by no means a complete guide, as it will only cover what I personally had to go through to make things work, but it should be enough for those that have similar specs for their PC.
# But why?
A while ago I found out that one of the VR games I own got a major update that looked really promising. Problem was, I am running Linux, and it was not working with ALVR and Proton… So, after a relatively long procrastination, I decided to just go for making a VM. Here comes problem number two: Steam Link! Since I have a Quest 2, I cannot just plug and play, I have to connect somewhere, and a regular VM with the default network just won’t do. The Steam app will not detect it! This is where the bridge networks came in clutch.
In short: I care about my privacy, and I was lazy to dualboot.
Anyways, let’s get going!
# The guide.
Like I said at the beginning, this will only cover parts that I personally had to do. This means there will be no mention for NVIDIA! The process is roughly the same, except you will have to patch your GPU vBIOS.
# Setting up your BIOS and GRUB
First thing on our list is to enable all the virtualization tools. Which means, you have to enable Intel VT-d or AMD-Vi in your BIOS. If you don’t see these options, your computer likely doesn’t support virtualization, making the rest of the steps irrelevant.
Then, we’ll need to enable IOMMU. To do that, you’ll need to edit /etc/default/grub like so:
|
|
For Intel CPUs, type
intel_iommuinstead ofamd_iommu
And now restart your computer. To check if things worked, use the dmesg | grep IOMMU commands (as root). You should see something like this:
|
|
# Installing and setting up packages
Great, you have virtualization enabled, and all your internals are ready to go. Time to set up your packages. I use Arch (btw), but the process is very similar on most systems, provided you don’t use something like SELinux, which I will not cover in this guide.
Arch Linux
|
|
Fedora
|
|
Ubuntu
|
|
After installing these packages, you have to enable some services:
systemd
|
|
OpenRC
|
|
You might need to force start your virtual network as well, you can do that by typing
|
|
# Setting up the guest OS
We’re getting closer, it’s time to install Windows. Get yourself a Windows ISO. Your first step is to make a new virtual machine using Virtual Machine Manager. Make sure to check “Customize configuration before install!” This is very important!
In the Overview section, set the VM’s chipset to Q35 (likely already the default), and the firmware to UEFI.
Then, go to the CPUs section and set the configuration to host-passthrough (once again, this is likely the default), and set the topology to your liking. I set it to 1 socket, 5 cores and 2 threads for example.
Go to the SATA Disk 1 section, and set it to Virtio. It will change to “Virtio Disk 1”. Do the same with your NIC!
Download the virtio-win ISO, and attach it as a CDROM device (Add Hardware > Storage > Device Type).
You can now hit “Begin Installation”! Go through the steps just like a normal Windows installation.
# Attaching your devices
After the Windows install is done, delete the Sound ich* and Channel (spice) devices, we will not need these anymore. Inside the Display Spice section, change the type to VNC server, and set the address to “All interfaces”. We will use this to connect to our VM to install the graphics drivers.
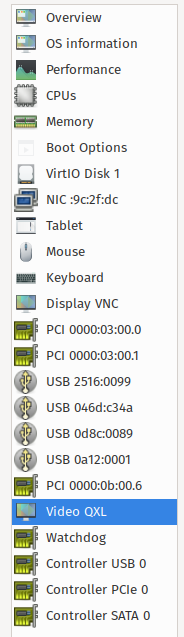
Add your GPU and the HDMI Audio PCI devices (Add Hardware > PCI Host Device). You can also add your USB host devices, we will not need them on the host anyways. Add your keyboard and mouse along with any other device you might need. I added my Bluetooth dongle for example. Your list should look something like this:
# Making the hooks
The fun part! To use our GPU for this VM, we have to unload everything that uses the GPU, along with the drivers.
# Libvirt hook
This is needed for libvirt to recognize our other hooks.
|
|
The contents of /etc/libvirt/hooks/qemu:
|
|
# The start hook
This is the script that gets executed when you start the VM. Make sure to replace win10 with your own VM’s name!
|
|
The contents of /etc/libvirt/hooks/qemu.d/win10/prepare/begin/start.sh:
|
|
# The release hook
This is the script that gets executed when you stop the VM. Make sure to replace win10 with your own VM’s name!
|
|
The contents of /etc/libvirt/hooks/qemu.d/win10/release/end/stop.sh:
|
|
# Testing the scripts
This is an optional step, but if these scripts don’t work you’ll either be stuck on a black screen until you reboot or your VM just won’t boot. Here’s how you test them:
- Enable SSH (
systemctl enable --now sshd) - Get a second computer and connect to your host
- To get your host computer’s IP, you can do
ip a
- To get your host computer’s IP, you can do
ssh username@youripaddress- Execute the start/stop scripts
sudo /etc/libvirt/hooks/qemu.d/win10/release/end/stop.shsudo /etc/libvirt/hooks/qemu.d/win10/prepare/begin/start.sh
# Audio passthrough
Since we’re not going to need the host computer’s audio, we can just pass the PCI device through. Search for something like “HD Audio Controller”, or if you have a dedicated card for it, add that one. You could also use Scream, or PipeWire. If you pass it directly, make sure to edit the part marked by “My audio controller”. Otherwise, comment it out.
# Virtualization detection
For some reason cards don’t like it whenyou run them in a VM. Here’s how you get around this. Inside your VM’s settings, go to the Overview section, switch to the XML tab, and edit the VM like this:
|
|
Hiding the KVM CPU isn’t necessary on AMD, but I added it just to be sure.
# Getting the GPU vBIOS
You could just dump it yourself if you know how to, but there are simpler ways, like just downloading the one you need for your card…
Make sure to get your card’s ROM! Check the brand, the vendor and the model!!
After you got the vBIOS, name it something simple like gpu.rom, and move it to a folder where libvirt can see it. I did this:
|
|
I got a strange error saying it can’t find the gpu.rom file when it had rwx permissions for everything, so I gave rwx permissions to everything in the folder, alongside the folder itself.
# Giving the vBIOS to your VM
In your VM settings, go to your GPU’s sections, the XML tab, and add this section to each one (the GPU and the HDMI audio controller):
|
|
Of course, change the path in file="..." to your path.
# The bridge network
Here’s the part I needed to fix Steam Link not working. We need the VM to be on the same network, so we’ll need to make a bridge network. You will need NetworkManager for this.
# Using Plasma’s System Settings
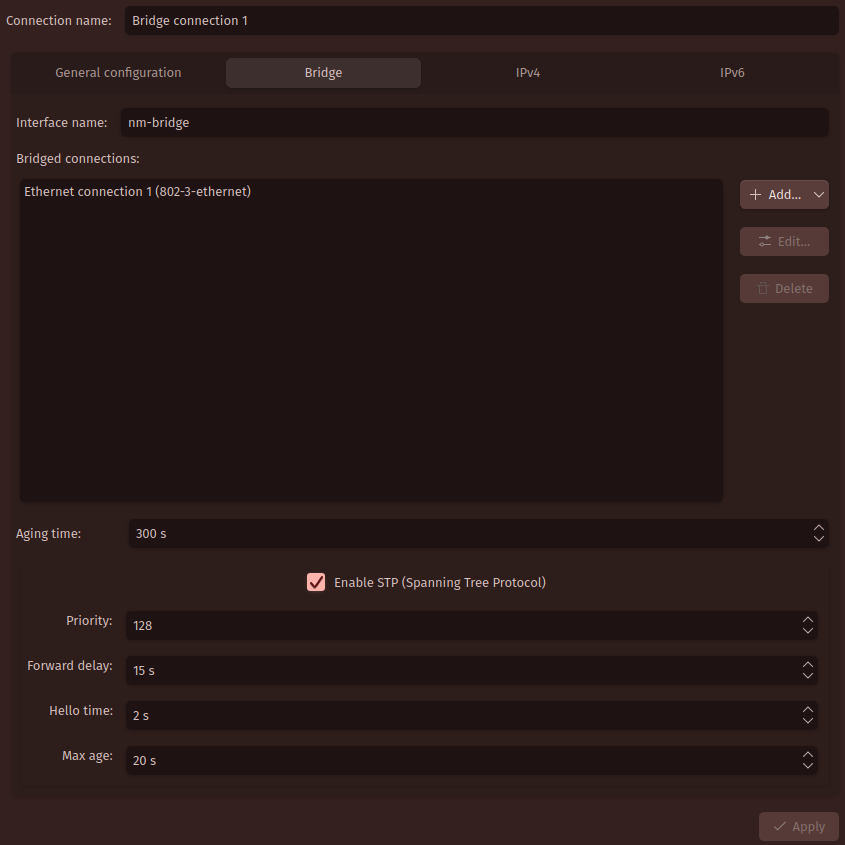
Inside System Settings, go to the Network category and then Connections. Click on the + sign to add a new connection, and select Bridge under the “Virtual connections” category. You can name the connection anything you want. Give a name to the interface, this will be used for the VM. You will have to add an Ethernet connection to the bridged connections. After you added it, hit save. Now, delete your original Wired Ethernet connection. You won’t need this anymore, as the bridge connection will handle everything.
Do not worry if you don’t have internet for a while after setting this up. If you did it right, it should take a while, but the new connection will set itself up again.
#
Using nmtui
The process is the same, except it’s in the terminal using NetworkManager’s built-in TUI tool. The notable difference is in the main menu. To add a connection, you have to go into the “Edit a connection” menu. There are no categories, you just have to select “Bridge”.
# The result
# Setting the VM’s network
Going back to our VM, go to the NIC section, and change the Network source to “Bridge device…”. The device name should be automatically filled in, but if it’s not, just put in the name you gave to your interface.
# That’s it!
You’re done! If any issues arise, comment them and I’ll do my best to resolve them and edit the post accordingly. Have fun with your new VM!
# Sources
GitHub/Gitlab
QaidVoid/Complete-Single-GPU-Passthrough
YouTube